Short story: As of today, I'm working for IBM. Same team, same project - with a shorter email.
Long story: Back in February, Red Hat announced that they were transferring their middleware division to IBM.
My position as a Software engineer was moved as a part of this transfer, and I've chosen to continue the journey here.
In the near term, I'll keep working on WildFly and JBoss EAP - focusing on their cloud & provisioning capabilities, user experience, and more. Business as usual.
As for the longer term, we'll see...
I had a great time at Red Hat and I will always look back fondly. Many of my colleagues in middleware are also moving to IBM, but I’ll miss those who stayed behind.
Red is in the past, blue is the color of the future. Here's to the next chapter of my career!
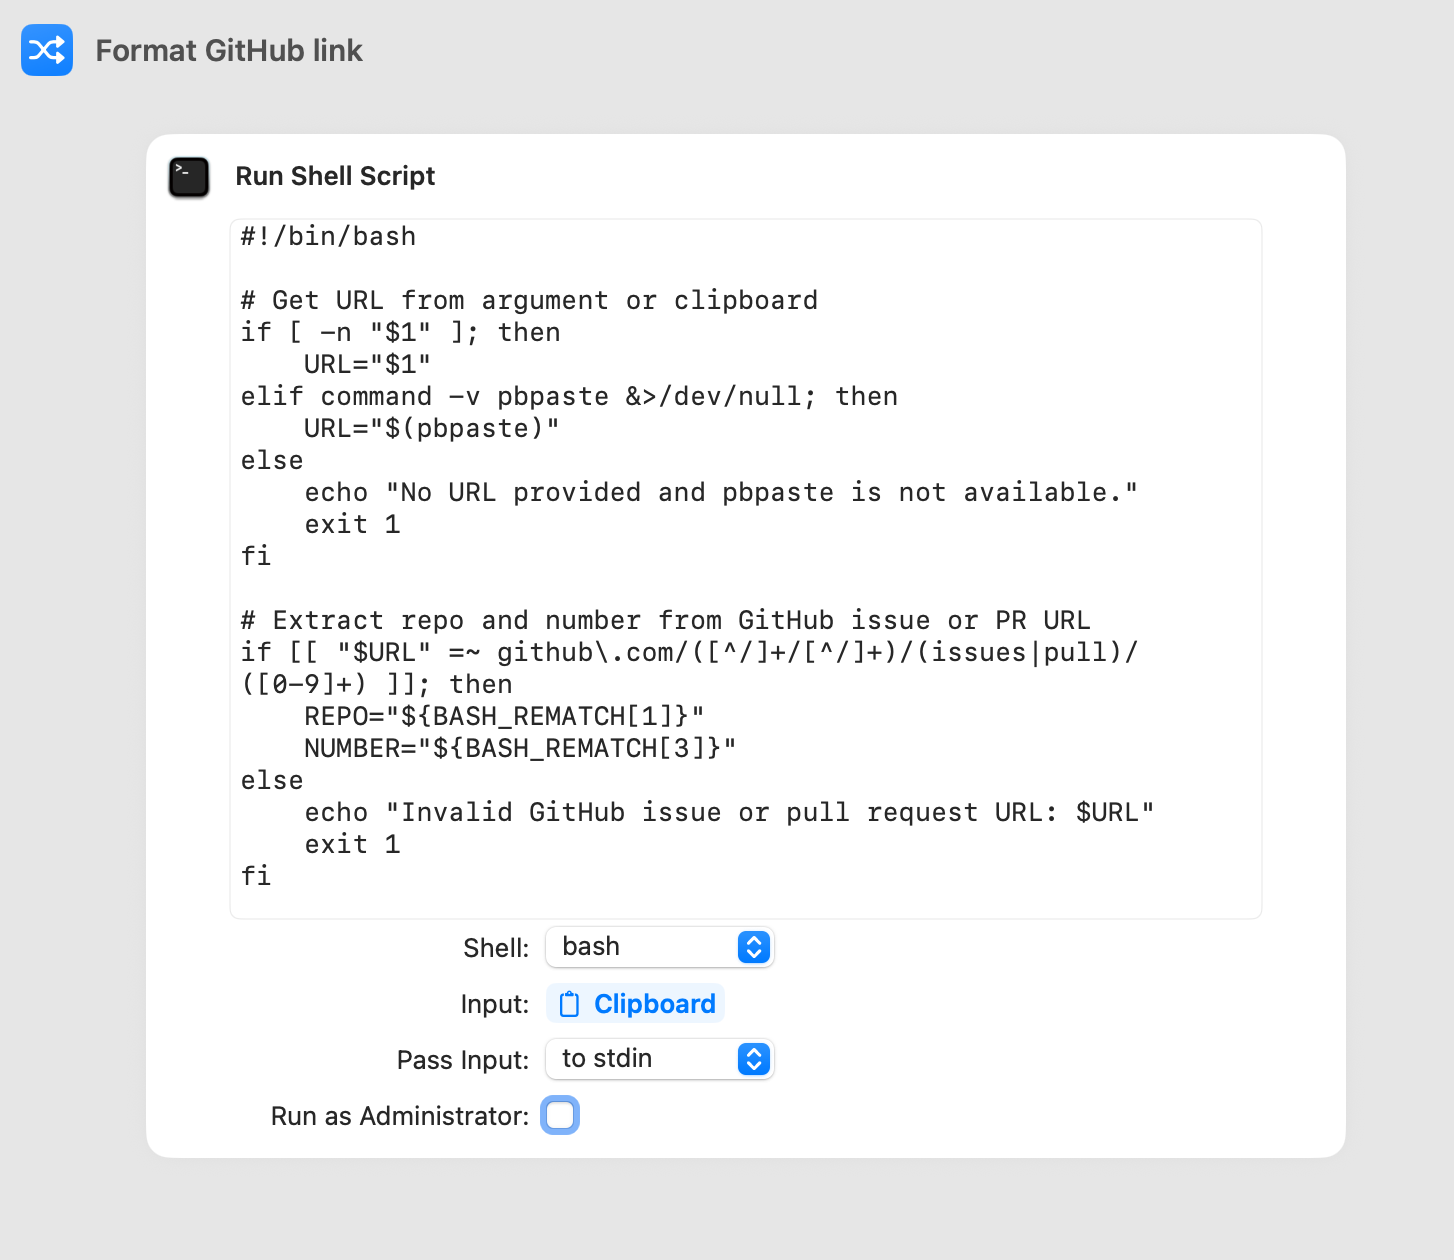
I'm changing these links so often that I wrote a simple bash script to do it for me. The script can take an GitHub issue or PR argument and will output the corresponding text: [<org>/<repo>#<pr_or_issue>] <title>:
#!/bin/bash
# Get URL from argument or clipboard
if [ -n "$1" ]; then
URL="$1"
elif command -v pbpaste &>/dev/null; then
URL="$(pbpaste)"
else
echo "No URL provided and pbpaste is not available."
exit 1
fi
# Extract repo and number from GitHub issue or PR URL
if [[ "$URL" =~ github\.com/([^/]+/[^/]+)/(issues|pull)/([0-9]+) ]]; then
REPO="${BASH_REMATCH[1]}"
NUMBER="${BASH_REMATCH[3]}"
else
echo "Invalid GitHub issue or pull request URL: $URL"
exit 1
fi
# Fetch and parse the <title> content
HTML_TITLE=$(curl -s "$URL" | sed -n 's:.*<title>\(.*\)</title>.*:\1:p' | head -n1)
# Decode HTML entities
HTML_TITLE=$(echo "$HTML_TITLE" | sed -e "s/'/'/g" -e 's/"/\"/g' -e 's/&/\&/g')
# Remove ' by AUTHOR' (before any dot)
HTML_TITLE=$(echo "$HTML_TITLE" | sed -E 's/ by [^·]+//')
# Remove everything after the first literal '·' (U+00B7), regardless of spacing
CLEAN_TITLE=$(echo "$HTML_TITLE" | sed 's/·.*//')
# Final formatted output
OUTPUT="[$REPO#$NUMBER] $CLEAN_TITLE"
# Copy to clipboard
if command -v pbcopy &>/dev/null; then
echo "$OUTPUT" | pbcopy
else
echo "Warning: Clipboard tool not found."
fi
# Output to terminal
echo "$OUTPUT"
afplay /System/Library/Sounds/Tink.aiff
To make it even simpler to use on my Mac, if there are no argument, it will instead use the content from the clipboard with pbpaste. It also copies the title to the clibpboard with pbcopy and play a sound when it is finished.
I saved this script as a "Format GitHub Link" shortcut with Apple Shortcuts to further streamline its use:
Run the script as an Apple Shortcut
Now, When I want to add a GitHub link to a document, all I need to do is:
copy its link address (⌘ C)
paste it in my doc (⌘ V)
use the Spotligh launcher to run the script (⌘ <space bar> > "Format")
After I hear the sound, copy the formatted title from the clipboard (⌘ V)
Unfortunately, the streaming was a bit compressed and made it difficult to read the code so you might be bettre looking at the slides directly.
The conference was a great success. Don't hesitate to provide some feedback about the presentation and if you are interested to have similar content about the user experience improvements we are making around WildFly.
Next week, I'll talk about prototyping WildFly application with JBang at the WildFly mini-conference on March 25th.
JBang is a tool to create, edit and run self-contained source-only Java programs with unprecedented ease. In this presentation, I will show how we can use JBang to prototype simple WildFly applications from a single Java source file. We start with a simple Web application and will prototype an AI chat bot.
I switched to a Apple Silicon laptop running on a ARM architecture and I often want to develop Go applications that are running both on ARM architecture (to run it on my laptop) as well as on Intel.
Go makes it very easy to target different architectures at build time but it makes the delivery of the software more complex as I have to deliver multiple binaries (linux on ARM, linux on Intel, Darwin on ARM, Darwin on Intel, etc.) There are tools for this such as GoReleaser but it still makes the deployment of the software more complex. A potential solution is to have a script file that determines the OS & architecture of the target platform and then download the appropriate executable.
Another solution that I am using more often is to deliver the software as a multi-arch container image. The user then just has to pull the image and run it with podman or docker.
As as simplistic example, let's say I need to write a Go application that gives the SHA-256 checksum of strings. To do so, I can create a Go module with a simple checksum application:
$ mkdir checksum
$ cd checksum
$ go mod init checksum
$ mkdir cmd
$ touch cmd/checksum.go
The content of the cmd/checksum.go is:
package main

import (
        "crypto/sha256"
        "encoding/hex"
        "fmt"
        "os"
)

func main() {

        if len(os.Args) == 1 {
                fmt.Printf("No arguments\n")
                fmt.Printf("Usage: checksum <list of strings to hash>\n")
                os.Exit(1)
        }

        strs := os.Args[1:]

        hash := sha256.New()

        for i, str := range strs {
                h.Reset()
                hash.Write([]byte(str))
                checksum := hash.Sum(nil)
                if i > 0 {
                        fmt.Printf(" ")
                }
                fmt.Printf("%s", hex.EncodeToString(checksum))
        }
        fmt.Printf("\n")
}
I can test that the application is working as expected by running it with go run:
$ go run ./cmd/checksum.go foo
2c26b46b68ffc68ff99b453c1d30413413422d706483bfa0f98a5e886266e7ae
Now, I need to create a container that provides this application for both the ARM and Intel architectures.
I need a simple Containerfile to do so:
FROM golang:1.23 AS go-builder

WORKDIR /workspace/
COPY . .
RUN GOOS=linux go build -o ./build/checksum ./cmd/checksum.go

FROM scratch

COPY --from=go-builder /workspace/build/checksum /
ENTRYPOINT [ "/checksum" ]
The container build is done in two stages:
I use the golang:1.23 builder to compile the code, targeting the linux operating system.
I create an image from scratch that only contains the executable compiled from the first stage.
Then I can use podman to build a multi-arch image (for both linux/amd64 and linux/arm64):
The resulting localhost/checksum image is small and contains only the checksum executable.
I can run it locally with podman:
$ podman run localhost/checksum foo

2c26b46b68ffc68ff99b453c1d30413413422d706483bfa0f98a5e886266e7ae
Podman will run the linux/arm64 image on my ARM laptop but an user on a Intel machine would use the linux/amd64 image. I can force Podman to use the Intel variant on my ARM laptop and it would run fine too (with a warning that the image no longer matches my platform)
$ podman run --platform linux/amd64 localhost/checksum foo

WARNING: image platform (linux/arm64) does not match the expected platform (linux/amd64)
2c26b46b68ffc68ff99b453c1d30413413422d706483bfa0f98a5e886266e7ae
At this point, to make the application available for others, I just need to push it to a container registry on Quay.io or ghcr.io and they will be able to use it as I do on my laptop.
This solution works fine for programs that don't need heavy integration with the host operating system. If my input would need to access the file system, I would have to mount directories with -v to make them available inside the image. If the integration with the host starts to be more complex, it would be better to provide a shell script that pulls the image and run Podman with the right configuration parameters.
I learnt yesterday the sad news that Dikembe Mutombo passed away at the age of 58 from a brain cancer.
He started his career in 1991 as I got interested in the NBA. He was a great player to watch as I enjoy the defensive side of Basket ball.
I fondly remember when he fell down the floor after upsetting the Seattle SuperSonics of Gary Payton and Shawn Kemp. That was the first time a 8th seed won against a 1st seed and his joy was contagious.
23 years later, I still have player cards from him that I scanned for this post.
Dikembe Mutombo Player Card
Next time I play with my kids, I'll show them how he was wagging his finger when he blocked an opponent shot :)
On the technical side, I don't remember all the solutions but I used Movable Type, BlogPost, WordPress. Eventually, I switched to a static generation of the content from Markdown pages in a Git repository that are pushed to a AWS S3 Bucket.
The latest technical changes I did were to use a container image to manage all the Ruby dependencies from Awestruct and adding a TLS Certificate to the server.
I have had bursts of activity on my web site and long periods of neglects but it is still great to have a place I can call my own on the Web...
[This week is Career Week at my company and a great opportunity to reflect on my career and what lies ahead]
A few years ago, my manager, Stefano, introduced me to the concept of defining personal Mission and Vision statements to help me guide my career.
I updated my About page some time ago with my professional mission statement but never elaborated on it. This post is a good opportunity to do so.
My professional mission statement is:
I aim to build software based on sustainability, openness, and humane values, driving towards a more equitable world.
I'm an engineer at heart so building software is what I do and what I enjoy the most.
We are facing a climate change that is impacting all humanity and it is our duty for ourselves and future generations to do as much as we can to circumvent it. In my profession, the best I can do is build sustainable software that have minimal carbon impact on the planet.
There are many approaches to build software, but I only want to do it in a way that fosters openness, transparency and human-centered values. I have been fortunate to work for many years with great colleagues and users that are kind, knowledgeable, willing to listen, giving and receiving constructive feedback.
I can't imagine switching to another working environment as I believe in a variant of Conway's law:
Organizations which design systems are constrained to produce designs which copy the behaviours of these organizations.
By acting with transparency and empathy, we are more likely to build software that creates a more open and humane world.
All I am doing professionally is making sure that I contribute to a better world for my kids, and the world I want for them is an equitable one where every individual has opportunities to grow, learn, and accomplish their goals.
I do not want to build software that benefits a few at the expense of the rest of the humanity. That is what attracted me to Open Source development at the beginning of my career, and I still believe in it more than 20 years later.
Unfortunately, my mission statement is at odds with most of the IT industry which aims for infinite growth at the expense of users, citizens, its own employees and the planet.
I have to live with that dichotomy and do my best to align the world with my values and beliefs. My mission statement is a simple effective way to never lose sight of what is truly meaningful to me.
Last weekend, I discussed with a friend the different approaches we had in our jobs.
I told him an anecdote from my study years.
I have a mathematical background and studied applied mathematics with a sprinkle of computing and applied physics.
During a trimester, our Physics teacher taught us a single theorem (sadly, I can't remember which one...). We had an upcoming exam and what could it be about if not this theorem? The day of the exam, we all applied the theorem as expected... and we all failed the exam.
During the correction, our teacher told us that we all applied the theorem to the stated problem without verifying that the constraints and boundaries were applicable. They were not and the theorem was not a solution to the problem.
The teacher explained to us that he "tricked" us on purpose. His objective was not to make us learn and apply the theorem but to make us think by ourselves:
First, understand the problem, its constraints, and its boundaries. Then see if there is an equation, a theorem that could apply to its resolution. Finally, use this tool to solve the problem optimally.
I told this anecdocte to my friend because that might be the best advice I got during all my studies.
As an engineer, my main task is to solve "problems" that our users face with the toolkits at their disposal.
The toolkits in the IT industry are ever expanding (Cloud! Microservices! Blockchains! Now AI!) and an increasing part of my work is to figure out if a tool is relevant for a given problem.
The reasoning should follow the advice of my teacher: first understand the problem to solve, then find the solutions that can be applied to it and finally find the optimal solution for the problem.
Of course, it is easier said than done as there is a strong industry push to find a technical solution to then apply it to any problem.
Let's move all our workloads to the cloud!
Let's add a chatbot to our applications!
Let's split our monolithic application into microservices!
These tools are fine and definitely suitable for many cases, but they are never universally applicable.
Following trends without ensuring they address the specific issue at hand can lead to wasted effort and resources, leaving us with all the downsides of a new technology without reaping its benefits.
Problem-solving is the most creative aspect of my engineering job, the one I enjoy the most and (talking about the latest IT trend) the one least likely to be replaced by artificial intelligence.
We have improved the Maven plug-in for WildFly to be able to provision and configure WildFly application server directly from the application source code. This make it very simple to control the server configuration and management model and make sure it is tailor-made for the application requirements.
This is a good model for DevOps team where a single team is responsible for the development and deployment of the application.
However, we have users that are in a different organisational structure where the Development team and the Operational team work in silos.
In this article, we will show how it is possible to leverage the WildFly Maven plugin to handle the configuration and deployment of WildFly separately from the application development in a loose GitOps manner.
Provision the WildFly Server
We will use a Maven project to control the application server installation and configuration.
mkdir wildfly-gitops
cd wildfly-gitops
touch pom.xml
The pom.xml will configure the provisioning and configuration of WildFly
This pom.xml will provision (install and configure) WildFly. The version of WildFly is configured with the version.wildfly property (set 31.0.0.Final in the snippet above).
Let's now install it with:
mvn clean package
Once the execution is finished, you have a WildFly server ready to run in target/server and you can run it with the command:
cd target/server
./bin/standalone.sh
The last log will show that we indeed installed WildFly 31.0.0.Final:
13:21:52,651 INFO [org.jboss.as] (Controller Boot Thread) WFLYSRV0025: WildFly Full 31.0.0.Final (WildFly Core 23.0.1.Final) started in 1229ms - Started 280 of 522 services (317 services are lazy, passive or on-demand) - Server configuration file in use: standalone.xml
At this point you can init a Git repository from this wildfly-gitops directory and you have the foundation to manage WildFly in a GitOps way.
The Maven Plugin for WildFly provides rich features to configure WildFly including:
using Galleon Layers to trim the server according to the deployment capabilities
Running CLI scripts to configure its subsystems (for example, the Logging Guide illustrates how you can add a Logging category for your own deployments)
[Aside] Create Application Deployments
To illustrate how to manage the deployments of application in this server without direct control of the application source code, we must first create these deployments.
When Dev and Ops teams are separate, the Dev team will have done these steps and the Ops team would only need to know the Maven coordinates of the deployments.
For this purpose, we will compile and install 2 quickstarts examples from WildFly in our local maven repository:
cd /tmp
git clone --depth 1 --branch 31.0.0.Final https://github.com/wildfly/quickstart.git
cd quickstart
mvn clean install -pl helloworld,microprofile-config
We have only built the helloworld and microprofile-config quickstarts and put them in our local Maven repository.
We now have two deployments that we want to deploy in our WildFly Server with the Maven coordinates:
We have added deployments using Maven dependencies but it is also possible to include them in the assembled server by other means (copy them from a local directory, fetch them from Internet, etc.). The Assembly Plugin provides additional information for this.
Update The WildFly Server
The version of WildFly that we are provisioning is specified in the pom.xml with the version.wildfly property. Let's change it to use a more recent version of WildFly 31.0.1.Final
<project>
  [...]
  <properties>
    <!-- Specify the version of WildFly to provision -->
    <version.wildfly>31.0.1.Final</version.wildfly>
We can repackage the server and see that it is now running WildFly 31.0.1.Final:
mvn clean package
cd target/wildfly-gitops-server/wildfly
...
14:15:23,909 INFO  [org.jboss.as] (Controller Boot Thread) WFLYSRV0025: WildFly Full 31.0.1.Final (WildFly Core 23.0.3.Final) started in 1938ms - Started 458 of 678 services (327 services are lazy, passive or on-demand) - Server configuration file in use: standalone.xml
Use Dependabot to Be Notified of WildFly Updates
WildFly provisioning is using Maven artifacts. We can take advantage of this to add a "symbolic" dependency to the WildFly Galleon Pack artifact in our pom.xml so that Dependabot will periodically check and propose updates when new versions of WildFly are available:
<project>
  [...]
  <dependencies>
    [...]
    </dependency>
      <!-- We add the WildFly Galleon Pack as a provided POM dependency
           to be able to  use dependabot to be notified of updates -->
      <dependency>
        <groupId>org.wildfly</groupId>
        <artifactId>wildfly-galleon-pack</artifactId>
        <version>${version.wildfly}</version>
        <type>pom</type>
        <scope>provided</scope>
      </dependency>
We use a provided scope as we don't want to pull this dependency but this will ensure that Dependabot is aware of it and triggers updates when a new version is available.
Summary
In this article, we show how you can leverage the WildFly Maven Plug-in to manage WildFly in a GitOps way that is not directly tied to the development of the applications that are be deployed to the server.